- Calculate or measure the needed lengths of the guys (the part of the “anchoring system” made from the synthetic rope).
- Add the length needed for proper end termination. For the standard terminations (thimble, clip, knot) it is about 60-times the rope diameter for each end.
- Cut the rope using hot edge (for example with a soldering iron). Melting temperature of polyester is about 260 °C (500 °F), Dyneema 150 °C (300 °F).
- Prepare appropriate thimble. If needed, you can open the thimble by pliers, thread on the attaching subject and close it to original shape. Small shape distortion has no influence to total strength.
- Prepare appropriate clip – dismantle it.
- The rope wraps around the thimble, place it to the clip and put the clip together (see Figure). The open end of the rope should be left free, about 35-times the rope diameter (for the safety knot).
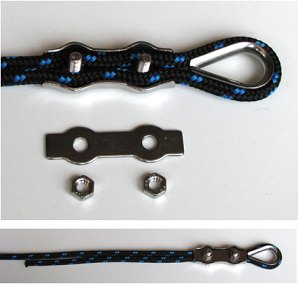
- Place the clip as close as possible to the thimble.
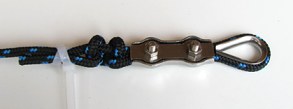
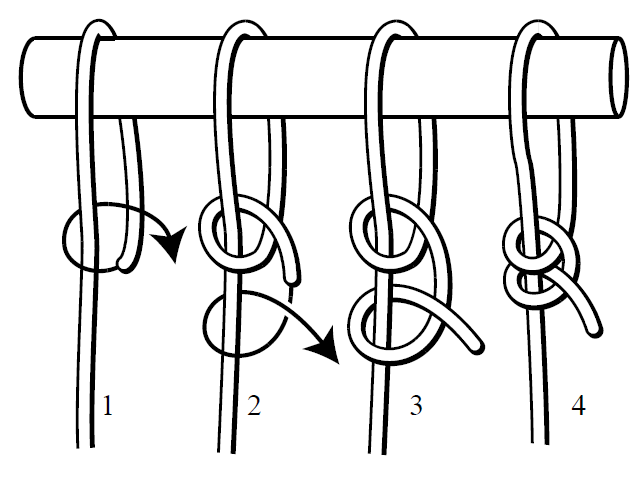
- Tighten the screws of the clip very firmly and make the knot (see Figure, we recommend Double Half-hitch). Fix the free end of the rope with a cable tie or rope clip (bull-dog grips are OK) to stop it fraying.
- It is necessary to tighten the clips repeatedly during tensioning the rope. Therefore at the inaccessible end of the guy is necessary to tighten before installing the guy. Attach the end of the rope (the one with the thimble) to a solid object and tighten the rope gradually. After each step (increase of tensioning force) tighten the screws of the clip. Ideally, the final tightening is performed at maximum workload (30% of the strength). With thicker ropes, however, this ideal is difficult to achieve – for example the stretching could be performed by a rope stretched between two fixed points and loading the rope perpendicular to the their axis with the required weight. Also we could use a car to pull on the rope or create a temporary hoist for tensioning.
- Place the guy where it will be used. Tension it gradually and tighten the clips (as described above).
- Visually check whether there has been slippage of the rope in the clip - if so, it means that we have not chosen a suitable tensioning and tightening procedure, or that the terminal is defective.
- For tensioning cables we can use threaded turnbuckles. For telescopic masts, we can do it without a turnbuckle. Lower the mast slightly and tighten clamps then wind the mast back up and retighten. The suitability of this procedure is, of course, different for each type of mast.
- Optimal pre-tension of the rope (tension in idle) is dependent on a number of factors - the design and strength of the mast, the type and strength of the rope, the distance from the base of the mast to the anchor point. In most applications best suited force is 5-20% of the strength of the rope. Do not guess! Calculate for your particular mast.
- After final tensioning of the guys in "idle" the rope will for some time continue "settling". Check the guys and, if necessary, tension them the next day after the installation and then about 3 times at intervals of about 1 week. We must always follow the correct procedure for tightening clamps!
Most common mistakes and accident causes:
- The anchor point is situated too near to the tower base and that is why the angle between the guy rope and the tower equals much less than 45 degrees.
- The clips weren’t re-tightened while the rope was under tension.
- Behind the clips there is no safety element (second clip, knot).
- The end of the rope is not terminated with a thimble, but tied directly to the construction.
- The rope was chewed through by an animal or cut through.